
Fellow Quilters,
Happy Saturday ! I was sitting down yesterday to write my blog post when my plans got derailed. Back on track now. I am sitting at my kitchen island “office” looking at snow flurries outside my window. Hellooo!?! It’s May!?! It’s supposed to be 17°C (60°F) at this time of year. No matter, I suppose, if I need to stay inside and social distance – a good opportunity to get my Time to Quilt blocks sewn together and into a quilt top. If you’re following along, Northcott has a backing prize up for grabs. For your chance to win, select at least 12 of your blocks and assemble them in a quilt top, then go to Northcott’s Facebook page on Monday May 11th to post a picture of your quilt top.
So, on Wednesday I talked about assembling your blocks in a straight setting using the same principle we used to sew some of our blocks together. The chain-piecing of each row of blocks to the next row makes assembly of our blocks and quilts warp-speed. The added bonus is that it keeps the units or blocks in the correct orientation and order. I showed how I will sew my FIGO Midsommar make-it-mini blocks together – straight-set with no sashing strips between the blocks. So how do we apply this concept if we have an on-point setting such as the one I’ve selected for my Vino quilt? Let me show you.

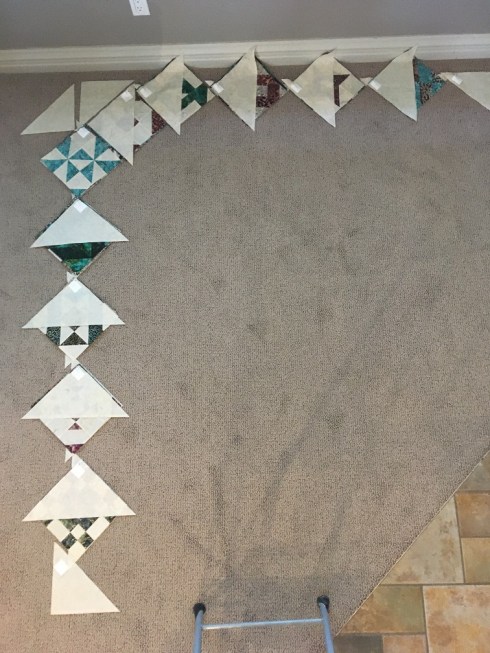
My Vino blocks laid out in an on-point setting
Here is a photo of my quilt blocks laid out in my almost-final arrangement. Now, I needed 50 blocks for this, so I quickly whipped up another pair of Block 4 since it was so fast. Even though I am putting sashing strips between the blocks and cornerstones at the intersections of the sashing strips I have not laid them out with the blocks because I don’t need to – I will add them as I’m sewing the blocks together. So you may be thinking that this doesn’t look easy to sew into rows. Let’s take another picture, on an angle this time – can you see the rows and columns now?

We pick up the units in columns 2-12 from bottom to top
Just like for the straight-set layout, we’ll pick up the blocks in all but the first column from BOTTOM TO TOP. We’ll include the setting triangles as well, keeping them aligned as they are in each column (this part is important). Note that the first “column” is just the corner triangle. Then we label each stack and flip all but the first column so that the pinned label is still at the top edge.
Label each stack and pin the label to the top edge so that all the pieces are attached
I leave the corner triangles from Stack #6 and #7 aside – I’ll add them at the end.

The bottom triangle from Stack 6 and top corner from Stack 7 are set aside and attached at the end
Gather them up in order and take them to the sewing machine. I’ve got my pile of sashing strips and cornerstones handy as well.

My piles of cornerstones and sashing pieces are handy
We are going to add our sashing/cornerstone pieces between each stack of blocks. Now, for Step 1 let’s take that first column (the corner triangle) and add a vertical sashing strip to it – center the triangle on the sashing piece so that there is ⅜” of triangle protruding beyond the top and bottom edge of the sashing (remember this tip from Block 3?). For Step 2 we are going to add Stack #2, but notice that there is nothing to sew the setting triangle units (the first and last pieces in our stack) to.
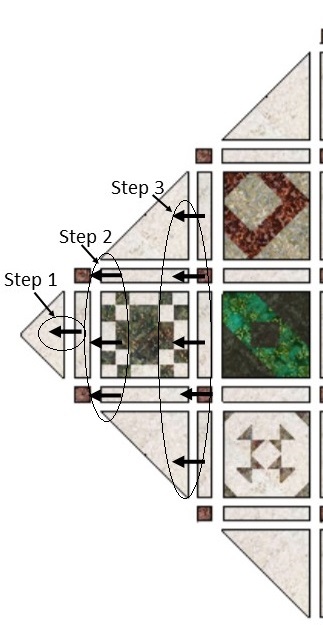
Steps 1-3
We can add the block to the sashing piece and we can also add the horizontal sashing pieces above and below the block by sewing them to a cornerstone (see Step 2 in the diagram). Step 3 is adding a vertical sashing/cornerstone column – we can add the triangles from Stack #2 at this point. We continue adding stacks alternately with vertical sashing/cornerstone columns, also including the horizontal sashing pieces between the blocks in each stack. My mantra as I’m working is “wide (block) column, then narrow (sashing) column”.
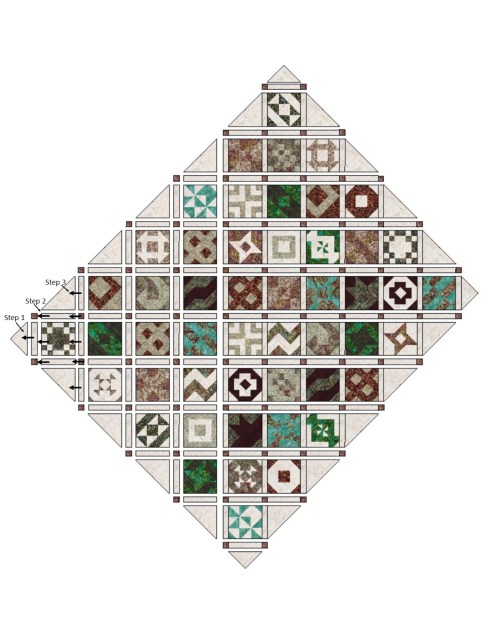
Continue adding Stacks 3-12
By the time we’re finished sewing the stacks together, the piles of sashing and cornerstones are gone. Then we sew the horizontal rows together. I pressed all my seams toward the sashing. This means that I pressed away from the cornerstones, and everything nested beautifully when I sewed the horizontal rows. Here is my quilt top at this point, just waiting for the outer border.

Just waiting for the outer border
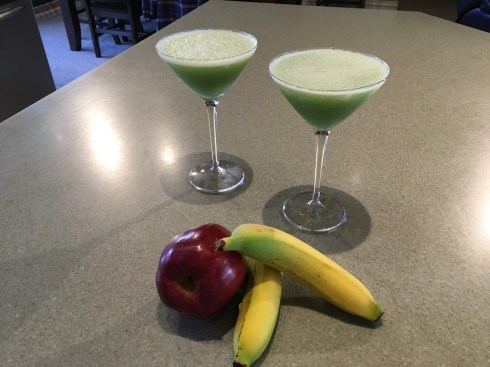
Now, because I wanted full cornerstone squares around the perimeter, I had to use extra-large setting triangles and add them at different stages than I do when I usually sew an on-point layout – it requires another level of concentration and coordination (ugh!). Apparently 2 large mugs of tea is not enough caffeine for this job, so I had some unpicking to do. I timed myself while assembling this quilt – it took 6½ hours. Let me know how you do! I rewarded myself with a beverage courtesy of the mixologist – a homemade concoction of banana, apple juice, crème de cacao and orange-flavored Blue Curacao (which made it green).
Our fruity concoction as a reward for getting my quilt top (almost) done
Speaking of the mixologist, Hubby finally selected a winner from the comments left on May 2nd’s blog – it is Judy Duffy. Congratulations to Judy!
Good luck with your quilt tops. I look forward to seeing them on Northcott’s Facebook page on Monday.
Cheers,
Patti


Yay! I’m so excited to win. Thanks Patti (& hubby). Can’t wait to see all the quilt tips on Monday. Have a great weekend. Stay warm.
You’re welcome 🙂