
Fellow Quilters,
Good Wednesday morning! Are you continuing to Stay-at-Home-and-Quilt? I had a conversation with a friend recently – she was asking what we had learned about ourselves during this stay-at-home period. For me it’s probably been virtual learning, though sadly not much in my life is different since I work from home. Hubby has learned to borrow virtual books from the library. And he has learned several new cocktails. The most recent ones were a choco-nut banana “martini” that I think is really more of a blender drink (he bought too many bananas and we’re trying to use them up before the fruit flies find them).

Sunday’s choco-nut banana beverage
Also a chocolate-orange-banana concoction using a homemade chocolate orange tawny port (yum),

Monday’s cocktail
and most recently a modified version of White Russian using Goldschlager – he had a miniature bottle of this and wanted to use it.

Tuesday’s cocktail du jour
He doesn’t like cinnamon so he didn’t use much. Apparently Goldschlager will be on the menu again soon.
So, big news on Northcott’s Time to Quilt Facebook page – there is another prize up for grabs. Northcott is throwing in a backing prize. To qualify, create a quilt top with at least 12 of your blocks by Monday May 11 and post a picture on Northcott’s Facebook page. The winner will receive enough backing for their top.
Today’s tip: I have a great tip for you today – it’s all about assembling your blocks into a quilt top. Remember way back on Day 6 when I talked about sewing the units of your block together and keeping the rows connected by a thread chain? I also talked about this on Day 7 wen we sewed the center part of Block 7 before adding the large triangles to the corners. So, we can apply the same principle to assembling our blocks into a quilt top. I worked with the FIGO blocks for this example. I arranged my blocks in 8 rows of 6.
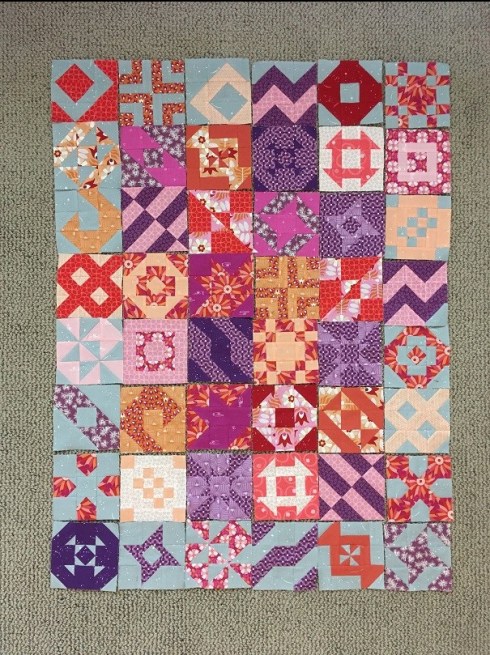
My FIGO blocks are arranged in 8 rows of 6
Notice which blocks are in the first and last rows (top and bottom). Okay, now I stacked the blocks in Column 1 in order from top to bottom, so #1 was on the top and #8 was on the bottom of the pile, keeping the top edge of each block at the top edge of my stack. I basically walked down the quilt, adding each consecutive row’s block to the back of my stack. I pinned a #1 tag to the top center of my stack. Then I started on Column #2. I picked up the last block (Row 8), then added the block in Row 7 to the back of my stack, then the block in Row 6 to the back of the stack, and so on until I got to Row 1. I now have a stack of the 8 blocks from Column 2 with the block from Row 8 on the TOP of the stack and the block from Row 1 on the bottom of the stack. I pinned a #2 tag to the top center of my stack. I continue to Column 3, working from bottom to top – the block from Row 8 is on the top of the stack and the block from Row 1 is on the bottom of the stack. All the columns except the first on are picked up from the bottom to the top.
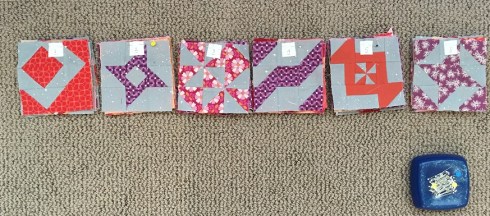
The first stack has blocks 1-8 (1 on top) and the rest of the stacks have blocks 8-1 (8 on top)
When you look at the photo you will notice that the block on stack #1 is from Row 1 and the blocks on stacks 2-6 are from Row 8. THEN I flip Stacks 2-6 over so that they are face down AND the pin is still at the top.

Flip Stacks 2-6 over so that the pin is still at the top

See that pin at the top?
This keeps the blocks in the correct alignment in the quilt. Now I can take stacks 1 & 2 to the sewing machine and sew them together. Stack 2 is ready to be added to Stack 1 – the block on the top of the face-down stack is from Row 1 and it’s in the correct alignment to be sewn to the right edge of the first block in Stack 1. Once I sew Stack 2 to Stack 1, I pin my #2 tag to the Row 1 or top block. I grab Stack 3 and sew the blocks to the Stack 2, then continue, adding Stacks 4-6. All the blocks are attached in a lattice and all the vertical rows have been sewn.

Each stack has been added – the vertical seams are all sewn and thread chains connect the rows to make a lattice
I usually finger-press the seams in the odd-numbered rows to the left and the seams in the even-numbered rows to the right. Now I simply sew my horizontal rows. Done!
Tomorrow or Friday I will show you how to apply the same concept to an on-point layout with sashing as I assemble my Vino quilt. It makes assembling the quilt 3 times faster than sewing each row together, then placing it back into the layout and sewing all the rows together. I will also announce the winner of the free pattern then – Hubby hasn’t made his choice yet and he’s gone to pick up a rack of moose antlers from his harvest last Fall. They’re not going to hang above the fireplace, that’s all I’m saying.
Cheers,
Patti


Leave a comment