
Fellow Quilters,
Good Monday morning! I am enjoying a bit of raspberry sour cream coffee cake this morning with my tea as I write this post. I had some sour cream languishing in the fridge, so what better way to use it than a coffee cake, sprinkled with languishing raspberries? Quite a few of my Facebook friends are trying their hand at baking during this Stay-at-home period. It’s fun to see their pics of freshly baked bread. It’s a good thing the aroma isn’t attached to the pictures!
We are whipping through the Time to Quilt quilt-along – on Block 13 already. I hope you’ve had time to work on the blocks, maybe spent some time over the weekend catching up. Is anyone else working on the Make-it-mini size? Please leave a comment on today’s post to let me know if you are. Yesterday’s block was easy peasy. Today’s is a bit more involved. Are you ready for a bit of a challenge? Then let’s get to it 😊.
I changed Block 13 around a bit to eliminate a couple seams.
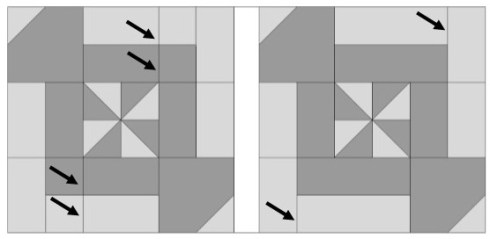
Original Block 13 and my version eliminating some seams
I lengthened the strip-pieced units in the top and bottom rows and simply added a small strip to the end to complete the look of the outer fabric strip rounding the corner of the block. Let’s talk about how we construct this block. First we make that center pinwheel. Are you becoming an expert at half-square triangle units? Me too! We spin the seams in the same direction as the half-square triangle seams – notice that the seams in the positive pinwheel spin in the opposite direction to the seams in the negative pinwheel.
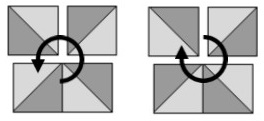
Press the seams in the same direction as the half-square triangle seams
The make-it-mini version is REALLY tiny – it’s mostly seam allowance!

You can see a mini pinwheel in the center where the seams spin
Once we have the corner sew-and-flip units and strip-pieced units sewn, it’s time to assemble the block.
Today’s tip: You may think you can’t chain-piece the units in a 3 x 3 grid like we discussed in Block 6 but you can – sort of. I chain-pieced the first 2 units in Row 1, then the first 2 units in Row 2, then the first 2 units in Row 3. It looked like this – note that the left edge of the whole thing is not aligned. That’s okay.

The units are not aligned at the left edge after chain-piecing the first 2 columns
Then I chain-pieced the third unit in each row onto the 2nd unit. The block doesn’t want to lay flat – until I clipped the chains in the top right and bottom left. I leave the top left and bottom right chains – this keeps everything connected so that the components are still all in the right positions.

Leave these 2 chains connected to keep the block components together
Then I simply sewed the 3 rows together. Done!
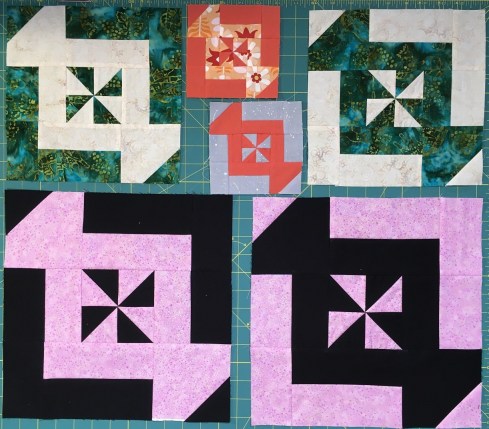
Block 13 done! Perfect pinwheels
You can find my instructions for Block 13 here.
Northcott has used the Spring-like Chelsea collection in their block and quilt today, and Banyan is using Rough Sketch for theirs. Pop on over to FIGO’s Instagram to see what Christina uses for today’s block, and Daphne has some great ideas on her blog.
Let me know how you’re doing. Is the pace too fast or just right? Are you making one of the alternate sizes (the make-it-mini or super-size)? Leave a comment below – thanks😊
See you tomorrow,
Patti


Ooooooh, raspberry coffee cake! Yes, I’ve noticed this i’net thing isn’t very good at transmitting smells. Thank goodness! We would all be whales.
First day to drop in and check things out. In red and white, your block would look like a peppermint twist/taffy.
Yes, it definitely would look like peppermint twist!
Hi Patti, I joined your blog recently on the advice of a quilting friend and am wondering how to get the block patters from #1 to #12. I am a” newby” to blogs and appreciate your thoughtful submissions, thanks, Barbara
>
Hi Barbara, thanks for joining 🙂 I appreciate your kind comments. Probably the best way to get the patterns is from each day’s blog post and here’s why – not only will you get the downloadable link to the pattern, you’ll also get the tip(s) on how best to make that day’s block. Enjoy the Time to Quilt quilt-along!