Fellow Quilters,
I think Hubby is enjoying his new-found role of mixologist as we continue our virtual cruise to Europe. Yesterday was Juno Beach with a side trip to Paris, so the cocktail du jour was French martini – a combination of vodka and gin, dry vermouth (Noilly Pratt of course, since it’s French) with a generous splash of Cointreau. Delicious!

Yesterday’s cocktail was a French martini
The latest round of weekly winners was announced on the Northcott Facebook page – were you one of them? Check the post today to collect your prize. And I see on FIGO’s Instagram feed that if you post a pic of your quilt top (that’s all the blocks sewn together, with borders and sashing if you’ve decided to go that route) by May 8 you’ll be entered for the grand prize drawing. Well, let me give you some ideas for those blocks you’ve so meticulously pieced over the past 24 days! PS. If you haven’t started yet, or you’re not finished yet, there’s still time.
So, on Northcott’s Facebook page today there is a picture of a quilt made with all 48 blocks, sewn together without sashing between the blocks, and what looks to me like a 5” border.
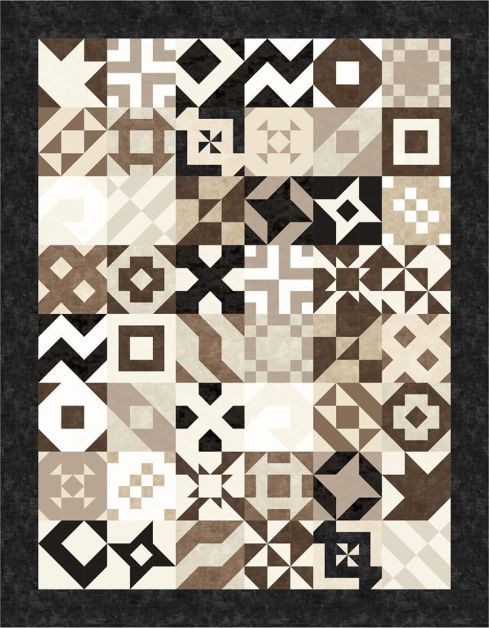
Simplest option – no sashing, and 5″ border
For this 64” x 82” quilt you’ll need roughly 40” of border fabric, cut into (7) 5¼” strips – join end-to-end and cut into (2) 72½” pieces and (2) 64” pieces. Sew your blocks together in 8 rows of 6, then sew the 72½” strips to each side then the 64” strips to top and bottom edges. Done!
On the Facebook page there is also a link to some finishing instructions. The quilt shown in here has sashing – 1” strips between the blocks and finishes at 70” x 90” including the 4¾” border. I used this layout for my Vino #1 quilt, made with 9” finished blocks, and this is what it looks like.

Vino #1 with 1″ sashing and 4 3/4″ borders – finishes at 70″ x 90″
Then I opened up my Electric Quilt program and played (it’s so easy to “make” quilts in EQ). I wondered what the blocks would look like on-point. Daphne made some virtual quilts with on-point layouts during her daily Time to Quilt blog posts. Here is my first rendition – no sashing and no borders – for a quilt that finishes at 64” x 77”. Let’s call this Vino #2.

Vino #2 – 64″ x 77″
Then I added 1½” sashing (cut 2”) to give the blocks a bit more space – Vino #3 finishes at 75” x 90”, similar in size to #1.

Vino #3 – 1 1/2″ sashing to finish at 75″ x 90″
What if I made my cornerstones (the squares at the intersections of the sashing strips) a contrasting fabric? It makes the quilt busier but it also adds interest – we’ll call this Vino #4.

Vino #4 – also 75″ x 90″ – with contrasting cornerstones
For my final version, Vino #5, I added an 8” border to make the quilt 92” x 107”.

Vino #5 – 92″ x 107″ – with 8″ border
So many choices! It really depends on what size I want my finished quilt to be – a large throw, a twin-size or a queen-size.
I want your opinion here. Please help me choose. Which of my 5 options do you like best? Please post a comment below. Also tell me which option you would choose for your blocks. I will randomly select a winner (the mixologist does this, actually) to receive a complimentary pdf pattern from Patti’s Patchwork.
Tomorrow I will post some design options using the 12” super-size Shimmer blocks, and also a couple more ideas for the 9” blocks. See you then!
Cheers,
Patti


I love all the layouts but #5 is just perfection to my eyes! The cornerstones add pop and keep my eyes moving throughout the blocks and that wide border makes the design float! I love it
Thanks Carol!
I love option #5. The blocks seem to float in it!
Thanks Sandy
The blocks are so dramatic, I think sashing is essential to distinguish them. Vino #5 is stunning. But I also like the simplicity of Vino #1 if a smaller size is required.
thanks – I appreciate your feedback
Vino # 5 is my favourite layout with the wide border . The quilt doesn’t look as busy with this layout. Everything just floats. I enjoyed your tips and shortcuts which I used for all you provided . It was so much easier to use longer strips than cutting more squares but the best was # 18 with slicing the blocks on the measured 3/8 in line. Wonderful shortcut. Thanks
Ann Power
Thanks Ann. I had fun coming up with the hopefully easier methods for some of the blocks. #18 was one of the best.
I love Version 4!! Cornerstones really add to design.
Thanks Pamela
Vino #5 is my choice too. Actually all 3 of the on point designs are lovely. The first 2 choices looked much too busy to my eyes. As the previous 3 ladies said the “floating ” aspect to Vino #5 puts it way above the other choices.
Thanks for your feedback Chris
I really liked setting three, lots of interest and less busy than 4 and 5. Seems the blocks are the stars in the simpler setting, at least for me.
Good to know – thanks!
I like #5 the best, but I think I would put a very thin dark brown (darker that the squares) or dark green or black border on the outside of the tiny brown squares before the wide neutral boarders. Just a thought. Yours and Daphne’s tips have been fantastic. Well worth the price of admission!! I love the one about using 2 different coloured neutral threads when piecing so you know which is the top thread…. I did not know that it was easier to pull out the top thread when picking out. From time to time it seem easier to pick out one side than the other but never made the connection that it was the top thread. I guess that’s because I so rarely have to do it………..and if you believe that I’ve got a 10 acre lake front property in Florida that I would like you to look at……….TTFN
Thanks for the feedback Betsey. So, I find that with some machines the top thread is easier to unpick and with others, it’s the bobbin thread. It sometimes depends on the thread choice as well.
Oh my goodness, Patti these are fabulous. I think I’m leaning towards Vino #4.
Thanks
I love #4 and #5, just beautiful layout
Thanks Sue
I absolutely love number 5. I had already bought fabric for sashing and border to match northcott’s instructions but if I was doing it again I would do number 5. Thanks for sharing your tips along the way I’ve appreciated them and used them a few times. Thanks so much!
Yes, me too. Thanks for your feedback and kind comments Alice
I like option #4. It’s the little triangles along the edges that really made me love that one.
Thanks Lisa. And here I was trying to turn them into full squares 🙂
I like #5 – there are so many block designs that it needs some spacing. My blocks are in piles as I’ve been contemplating borders around the blocks too. I do like the “on point” look.
Thanks Elaine. The on-point setting changes how the quilt looks.
While all of them are beautiful, Vino #5 is my favorite!
Thanks Kathy
I pick Vino 5 as my choice! The added features finish it elegantly!
Thanks Sandy
I like the very last one! It is gorgeous!!! Vino #5! I may even have to borrow this!
Thanks Kim
I like Vino #3. Not too busy to take attention from the so variable blocks.
I will be using Vino #1 for my blocks. I used black in each block so will be looking for a sashing & border fabric in black but with a very subliminal print like a subtle dot or simple pattern to differentiate it from the black in the blocks. I have a fat quarter of the exact fabric in mind but must try to find something similar. Difficult with Covid restricting shopping. I’ve enjoyed this 48 block exercise & will miss doing my daily homework! Thnx for the inspiration!
You’re welcome. Glad you could quilt along with me.
All of your quilts are so beautiful!
Thanks Kathy
Option #5 if my favourite and if I hadn’t already put my sashings on I would go that route
Thanks Angela. Maybe for your next one 🙂
I like #5 with the wider border and blocks on point.
Thanks Jean
I like Vino #2, just enough to set off the blocks.
Thanks Carol
Call me old fashioned Patti, but I like #1 as each one pops out to my view.
Thanks for your feedback!
Vino #4 looks great!
Thanks for your feed back Debbi.