
Fellow Quilters,
Welcome to Day 11 of the Time to Quilt quilt-along. I’ve seen some great photos of daily blocks and design walls being filled in with the completed blocks to date. Keep them coming! They tell me that you’re following along. If you posted blocks yesterday on Northcott’s Facebook page, pop on over to see if you’re a winner.
Just in case you think I’ve got these daily patterns, blog posts and quilting tips prepared ahead of time let me assure you that I don’t – in fact I am only 2-3 hours ahead of you getting my block done! And every day as I sit down to sew my block, phone at the ready to snap some pics for the blog post, I am thinking “Okay, what will I be able to come up with today for a tip? What if I can’t think of one?!?” Fingers crossed that won’t happen. Have you learned something new from the tips? Let me know your favorite one so far!
So, on to Block 11. I didn’t change the cutting and instructions for this block at all – there was no easier way that I could think of to cut and piece it. We’ve made the half-square triangle units and sew-and-flip corner triangle units in several of the earlier blocks. One thing I did notice when I was assembling the block is that a few of those half-square triangle units will nest together when we sew one unit to the adjacent unit.
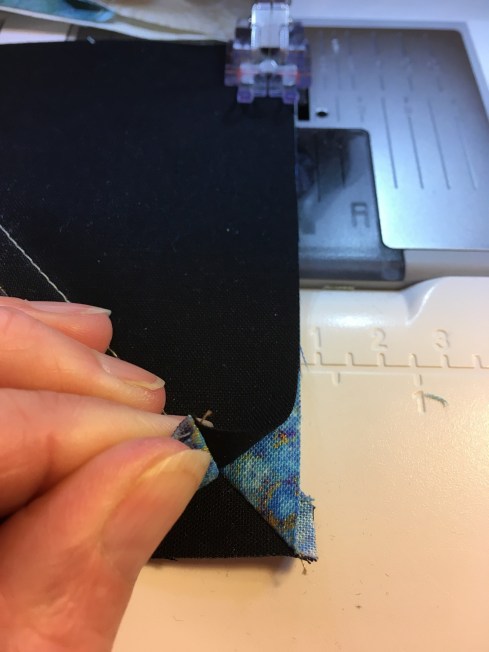
The angled seams in the half-square triangle units nest for perfect points
This helps our triangle seams form perfect points. My cool hack for this block comes once it is done.
Today’s tip: Tip #3 in yesterday’s post showed us how to spin those seams in the 4-patch unit to distribute the bulk of those 4 seams coming together. Well, we’re going to apply the same concept to today’s block and take it to the next level. When you look at the block can you see 2 pinwheel intersections, where 4 half-square triangle units come together?
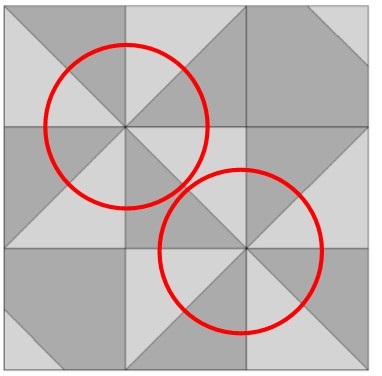
2 pinwheel intersections
We’re going to cut the thread chain (if we have chain-pieced our block units together).

Cut the thread chain linking the 2 rows
Then we can make the seams spin in the same direction as the vertical and horizontal seams at the intersection.

Pull the pinwheel apart. The vertical stitches in the seam allowance will come undone – this is okay!
I learned this tip in a pinwheel workshop with quilting icon Eleanor Burns many years ago (yes, we also learned to throw our scraps over our shoulder 😊). To really flatten that seam intersection, we “smoosh” it with our thumb on the back of the block – press and rotate in the same direction as the seams.
What this means is that 2/3 of each horizontal row is pressed in one direction and 1/3 of the row is pressed in the other direction.

2/3 of each horizontal row is pressed in one direction and 1/3 is pressed in the other direction
And there you have it – the blocks are done!
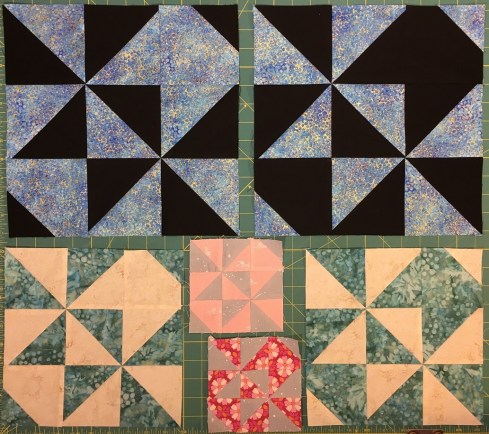
Block 11 done 🙂
You can find my instructions for Block 11 here.
Northcott has used the dreamy Tree of Wisdom for their block and Banyan has used Sazerac by Tiffany Hayes of Needle in a Hayes Stack (do you know what a Sazerac is?). Christina will be posting FIGO’s block shortly, and pop on over to Daphne’s blog to see what she has done with Block 11 made with Tapa Cloth.
Have a great day 😊
Cheers,
Patti


Leave a comment