
Fellow Quilters,
Just when I thought Spring was finally here it snowed last night. The daffodils that were ready to bloom on Sunday when it was a balmy 13°C (55°F) are now dusted with snow, and the robins are having a harder time finding nest-building supplies now under a layer of white stuff. It’s interesting to watch them manage in these adverse conditions, just as we are managing these unprecedented times. Have you found that an hour or two of quilting is your therapy? I have this door-hanger on the handle of my longarm machine and it makes me smile.

My door-hanger on my longarm machine in my sewing room
Quilting is good for us – statistics show that it reduces stress. So let’s get to our Time to Quilt stress-reduction for today 😊
Time to Quilt Block 7 is another block that I couldn’t leave well enough alone. Now, you can easily download the original pattern on Northcott’s, Banyan’s and FIGO’s Facebook pages like everyone else is doing. Nothing wrong with that at all! However, I have another hack to make this block easier and faster, ‘cause that’s what I do – I can’t help it, it’s how my brain is wired. Work with me for a minute here while I explain…
When I looked at this block, I saw large triangles in the two opposite corners – do you see them too?
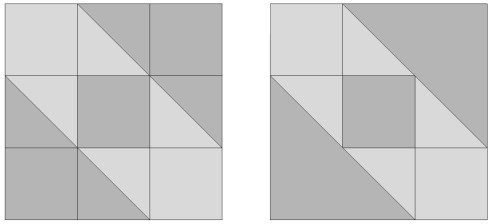
original Block 7 vs my revised Block 7
We can eliminate 4 seams in the block by using a large triangle in place of the corner square and two small triangles. Let’s do it.
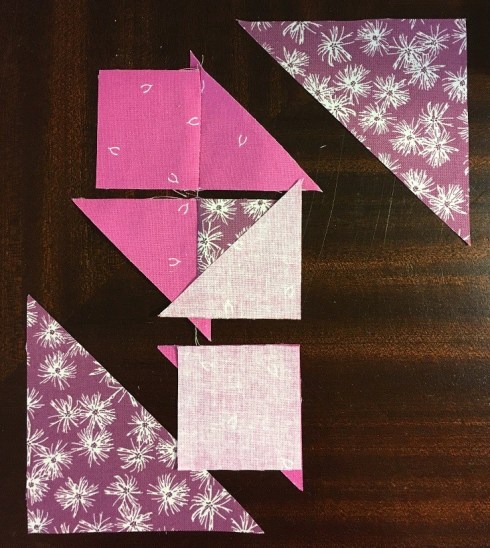
So, yesterday my tip showed you how to assemble the block faster by chain-piecing the units and sections. We’re going to do the same thing with the center part of this block. I laid out the components for the block.

The squares and small triangles form 3 rows of 3
Can you see that the squares and small triangles are arranged in 3 rows and 3 columns? Ignore the 2 large triangles for a moment. Note that Row 1 is missing a piece in Column 3, and Row 3 is missing a piece in Column 1 – that’s okay. I flipped the triangle and square in the 2nd column onto the square and triangle in the first column, then chain-pieced them and placed them back into my arrangement.

Flip the pieces in Column 2 onto the pieces in Column 1

Sew Column 2 to Column 1, finger-press seams toward squares and place back into the layout
Then I flipped the triangle and square in the 3rd column onto the square and triangle in the 2nd column and chain-pieced them.
Flip the pieces in Column 3 onto the pieces in Column 2

The 3 rows are connected by the thread chains and ready to sew together.
I finger-pressed my seams toward the squares as indicated in my instructions. Then I sewed the 1st row to the 2nd row – they’re still connected by that thread chain – then sewed the 2nd row to the 3rd row and finger-pressed the seams toward Rows 1 & 3.

I sewed the 3 rows together and finger-pressed toward Rows 1 & 3. Leave the triangle tips on!
Today’s tip: I thought about trimming those triangle tips but I stopped – I will used them as a guide when I sew the corner large triangles onto the block. I laid my center section face down on my large triangle and aligned the triangle tips with the ends of my large triangle, then I sewed the seam.
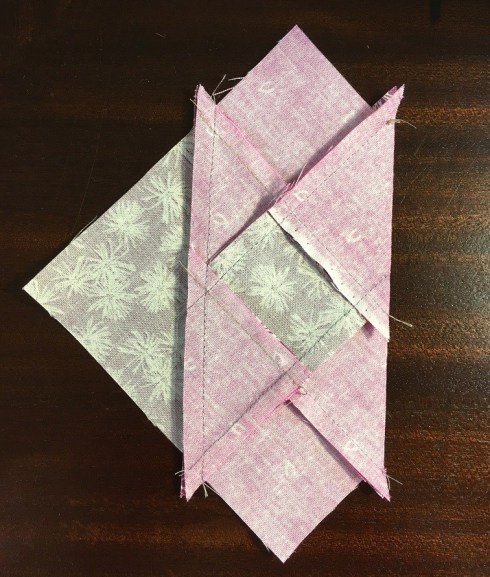
Lay the center section on the large triangle, aligning the triangle tips
Now I trimmed my triangle tips. Perfect! Done!

Block 7 done 🙂
You can find my instructions for Block 7 here.
Pop on over to my friend Daphne’s blog to see what she’s done with today’s block. Northcott has used Rod & Reel in their block/quilt and Banyan is showing Cherry Blossoms – pretty!
See you tomorrow 😊
Patti


Leave a comment